In my last blog post I shared my experience with the installation process of a clean Sitecore 10 solution on Azure Kubernetes Services. The next natural step is to explore how to automatically deploy a custom containerized solution to my AKS cluster, using Jenkins CI/CD tool. This blog post is the first of two posts, where I will describe the steps needed to implement Jenkins pipelines to build and deploy a containerized solution to Azure Kubernetes Services. Let’s start in this post with the build pipeline.
POSTS IN THIS SERIES:
- Jenkins Pipelines for Sitecore 10 on AKS – Part 1: The Build Pipeline
- Jenkins Pipelines for Sitecore 10 on AKS – Part 2: The Deploy Pipeline
Why Jenkins?
You don’t have to use Azure DevOps (or Azure Pipelines) to deploy a containerized solution to an Azure Kubernetes Service resource, but you can use the CI/CD tool that you are more comfortable with and that satisfies your DevOps goals. In my case, I learned to use Jenkins when I joined my company 8 years ago. In all these years I became familiar with its graphical interface and its functionalities and so far I liked it. If Jenkins is your CI/CD tool too, this mini series of blog posts will help you to setup a complete workflow to build and deploy a containerized custom Sitecore solution to AKS.
Software Prerequisites
In my setup, I used the latest version of Jenkins (2.280.0), installed on a Windows virtual machine following the tool official installation instructions. During the Jenkins installation, I selected the option to install suggested plugins to install the recommended set of plugins, which are based on most common use cases. They include the Git plugin and all the Pipeline declarative plugins used in the Jenkins pipelines that I implemented.
The following additional software is also required to be installed on the Jenkins virtual machine, using their latest stable version:
- Git for Windows
- Azure CLI
- Docker Desktop for Windows
- Kubernetes CLI
The following Jenkins plugins are needed to be manually installed in Jenkins as well:
- Azure CLI plugin
- Kubernetes CLI plugin
Assumptions
In my Azure subscription, I already had an AKS cluster with a clean Sitecore 10 instance. If you don’t have one yet, follow the steps described in the official Sitecore Installation Guide for Production Environments with Kubernetes and read my observations in my previous blog post.
The Jenkins pipelines shared in this series assume the usage of a containerized solution, with the recommended folder structure for container development as shared in the custom-images section of the Sitecore Docker Examples Github repository. For this implementation, I directly used a forked version of that repository.
Additional Needed Azure Resources
Azure Container Registry
The build pipeline, as the name suggests, is responsible to build the assets of a containerized custom Sitecore solution. The artifacts of this pipeline are images that are stored to an Azure Container Registry resource that our Sitecore AKS cluster has access to. If you don’t have an ACR resource in your Azure subscription yet, you can easily create one following this quick tutorial on the Azure CLI documentation portal. It is important that the existing AKS cluster has access to your ACR instance and this integration can be configured using the Azure CLI as described here on the Azure CLI documentation.
Azure Service Principal
In order for the Jenkins processing agent to access the Azure resources in the Azure subscription, an Azure Service Principle identity needs to be created in the Azure directory of the subscription. This tutorial explains how to create it and how to grant access to Azure resources with specific roles. In the context of the Jenkins Build pipeline, the service principal identity needs at least Reader, AcrPush and AcrPull role access to the ACR resource. The Service Principal identity credentials can be stored in the Jenkins credentials store using the Microsoft Azure Service Principal credential type, configuring a client Id and client secret combination or importing a certificate.
The Stages of the Build Pipeline
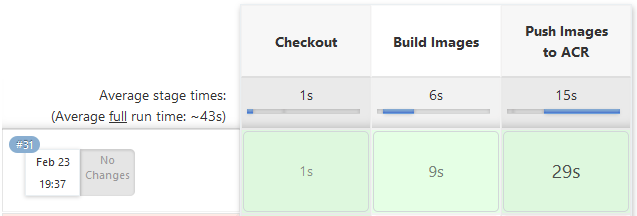
The pipeline of a non-containerized solution assumes that all build steps are executed in the context of the Jenkins agent and it might require many separate stages or steps defined in the Jenkins pipeline, based on the complexity of the build process. For a containerized solution, the build pipeline is very concise instead and consists of only three main stages: checkout, build images and push images to the Azure Container Registry (ACR).
The build steps of the Sitecore custom solution are now defined in the Dockerfile file used by the build context of the solution image, isolating the execution of these steps in a Docker container instead on relying on the build tools installed in the Jenkins host environment. It is in the Dockerfile, for example, that the msbuild command is invoked and where other custom build steps could be added and invoked during the solution image build process (for example, to compile static front-end code using nodejs npm modules). This containerized approach brings the benefit of a more consistent and reproducible build process, eliminating eventual host environment conflicts and mismatches of tools versions.
The Jenkins Build Pipeline Script
The build pipeline script starts with the parameters section to define the Environment parameter, used to dynamically set the name of the git repository branch that matches a specific environment (for example develop, uat, regression,…). If this Jenkins pipeline becomes part of a Jenkins Pipeline library that can be referenced in a Jenkinsfile, then the parameters section should be converted to a dynamic mapping parameters input to allow to define the input parameters in the Jenkinsfile where it is referenced.
The environment section defines the environment variables used in the stages of the pipeline. The REGISTRY, VERSION and COMPOSE_PROJECT_NAME are environment variables used in the original Docker files in the custom-images Sitecore Docker example solution. The VERSION value has been dynamically configured to be a concatenation of the Jenkins job build number and the environment/branch input parameter value (an example of value would be 28-develop). Indeed as described in the Kubernetes Best Practices page:
“you should avoid using the
:latesttag when deploying containers in production as it is harder to track which version of the image is running and more difficult to roll back properly”.
The Checkout stage is the first of the three stages in this build pipeline. It consists in simply invoking the checkout command to pull the code of a GitHub repository for a specific branch.
The Build Images stage consists in invoking the docker-compose build command with the docker-compose files that define the build context and build arguments for each image in this topology. In this stage the images are built and tagged properly.
The Push Images to ACR stage is the final stage of this build pipeline and consists in authenticating to the Azure ACR resource using the Azure CLI and invoking a docker-compose push command to push the built tagged images to the ACR resource.
The following script shows the full implemented Jenkins Build pipeline:
| pipeline { | |
| agent any | |
| parameters { | |
| string(name: 'Environment', defaultValue: 'develop', description: 'Environment/Branch name') | |
| } | |
| environment { | |
| REGISTRY = 'myacrregistry.azurecr.io/' | |
| GIT_REPO_URL = 'https://github.com/afaniuolo/docker-examples.git' | |
| VERSION = "${env.BUILD_NUMBER}-${params.Environment}" | |
| COMPOSE_PROJECT_NAME = "mycustomsolution" | |
| PRINCIPAL_SERVICE_CREDENTIAL_ID = "xxxxxxxx-xxxx-xxxx-xxxx-xxxxxxxxxxxx" | |
| } | |
| stages { | |
| stage('Checkout') { | |
| steps { | |
| checkout([$class: 'GitSCM', branches: [[name: '*/' + params.Environment]], extensions: [], userRemoteConfigs: [[url: GIT_REPO_URL]]]) | |
| } | |
| } | |
| stage('Build Images') { | |
| steps { | |
| script { | |
| dir('custom-images') { | |
| bat "docker-compose -f .\\docker-compose.xm1.yml -f .\\docker-compose.xm1.override.yml build" | |
| } | |
| } | |
| } | |
| } | |
| stage('Push Images to ACR') { | |
| steps { | |
| script { | |
| dir('custom-images') { | |
| azureCLI commands: [[exportVariablesString: '', script: 'az acr login --name ' + REGISTRY]], principalCredentialId: PRINCIPAL_SERVICE_CREDENTIAL_ID | |
| bat "docker-compose -f .\\docker-compose.xm1.yml -f .\\docker-compose.xm1.override.yml push" | |
| } | |
| } | |
| } | |
| } | |
| } | |
| } |
A Jenkins job using this build pipeline takes about 30 minutes the first time is executed, because the Docker images are built and pushed to the ACR resource for the first time. The next job executions are much faster because image layers without modifications will be cached and will not need to be pushed to the ACR resource again.
Future Improvements
The built images are the artifacts of the build pipeline and the disk space that they occupy will grow overtime if there is no automated mechanism to gradually purge them, keeping only the latest N images. The obsolete built images need to be deleted not only on the build virtual machine that hosts the Jenkins instance, but also on the Azure ACR resource. This article describes the steps to setup an Azure ACR task to automatically purge images from an Azure Container Registry resource. An additional stage can be implemented at the end of this build pipeline to prune obsolete images from the Jenkins file system using the Docker CLI commands.
Conclusions
In this first blog post of the Jenkins Pipelines for Sitecore 10 on AKS series I described how to implement a build pipeline for Jenkins. In the next upcoming blog post I will describe the steps needed to implement a Jenkins Deploy pipeline to publish the built artifacts to the Sitecore AKS cluster resource. If you have any questions please don’t hesitate to reach out or comment on this post.
Thank you for reading!
